Arduino 101: Tutorial #1 |Introduction|
What is an Arduino?
Arduino is an open source platform, a microcontroller and software. It is designed to make electronics more accessible to students, designers, hobbyists or anyone interested in creating interactive objects or environments.If you're a beginner and have never used a microcontroller, or for that matter any other associated electronics, arduino provides an easy to use, user friendly platform to start your journey.
What can Arduino do?
The Arduino microcontroller has a nearly limitless array of innovative applications for everything from robotics and lighting to games and gardening! It's a fun way to automate everything, enabling you to control simple devices or manage complex home automation systems.From merely blinking an led to start using a touch screen, arduino is capable of handling all levels of difficulties maintaining the user-friendly environment. The biggest strength of Arduino certainly has to be the open community. You can find thousands of articles just like this one to get started. Also, the forum platform of arduino is very good. If you ever get in any problem with the code or hardware, you can always raise your questions in the forum and expect to get answers within SECONDS!
Getting started:
Before we start with the tutorial series, let's discuss what all components are we going to need through our course.- Arduino UNO
- USB cable for arduino
- Breadboard
- LED's
- Resistors/Potentiometers
- Servo motors
For this tutorial, an arduino UNO with USB cable would be enough.
STEP 1: Setting up computer to program arduino.
- Goto Arduino website and download the software for whatever OS you're using.
- Open the arduino program.
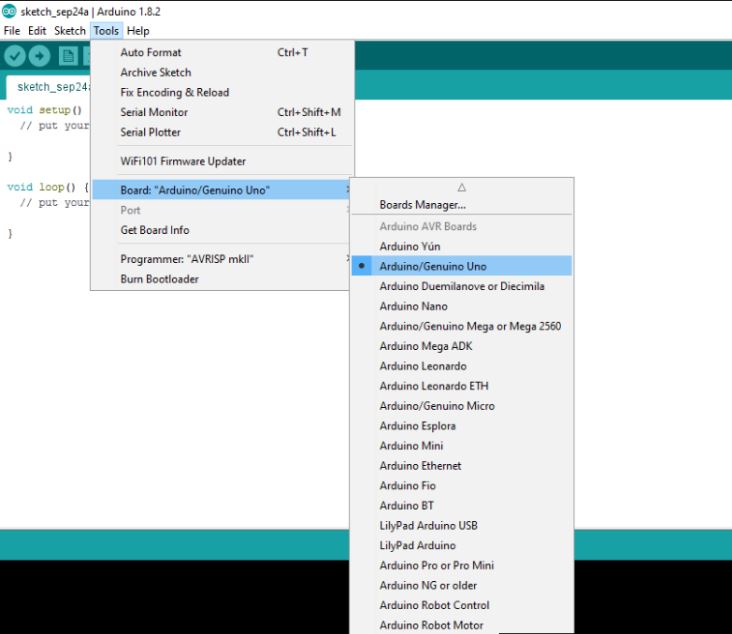
- Select the right type of arduino board.Goto Tools> Board> Arduino/Genuino UNO
STEP 2: Writing our first Arduino program.
To get started, let's make a very basic program. The only function the program is going to do is to blink an LED on and off over and over again. For this tutorial we don't even need an external LED, we'll use an inbuilt LED in the arduino UNO. The LED in arduino UNO is by design connected to digital pin 13.
Describing the code briefly, all arduino programs need to have two methods in them, one we call"setup" and the other one "loop".Setup essentially means "setting things up" that will run once in the beginning of the arduino program when it's turned on and the loop part of the program is setting up things that run as long as the arduino is on.
STEP 3: Defining Variables
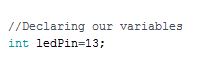
Starting with the program, we're first going to define some variables at the top. For those who are not familiar with coding, all we're doing is defining an integer variable "ledPin".All pins on arduino can be used as input and output pin. In our program we're going to use pin 13, since it has a built in LED connected to it. It has to be written in a certain format so that the compiler understands it's meaning. The way we define our variable at pin 13 is:
STEP 4: Setup
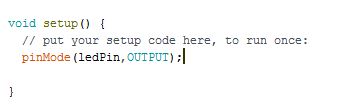
As previously discussed, a setup is that part of the code that runs only one time once the arduino is turned ON. Now within setup, we're going to use the command "pinMode" to define our output pin. What it essentially does is it sets the pin 13 to output. Just as the variable declaration, writing this command also follows a certain procedure.
There are two arguments that are required to define the command pinMode.
- The number pin you want to setup.
- Whether you want it to be input or output.
STEP 5: Loop
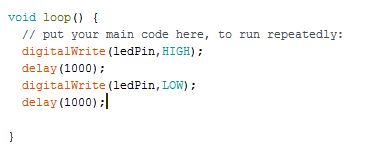
Now we're going to write our loop, it's very simple. The only thing it's going to do is:
- Turn the LED on(HIGH)
- Wait a bit(delay)
- Turn the LED off(LOW)
- Again wait a bit
As it loops, it will keep blinking the LED on and off. Now ,to set the value of digital pin, we use the command called "digitalWrite". Just as pinMode it takes two arguments, which pin you want to set and its state. Another command that we use is "delay" as we want LED to stay high before it does the next thing. The delay takes an argument in milliseconds. So we'll put in a 1000. That will keep the LED on for one second until we go to the next command. The code for loop should now look like this:
STEP 6: Upload
Connect the arduino via USB cable to the computer and select the correct "COM PORT" by going to TOOLS>port>"Your COM PORT". Now hit the upload button at the top.

You will be able to observe the LED on your arduino blinking. Finally, the complete code looks loke this:

And with this we end our first tutorial on Arduino. As an exercise until the next tutorial, I recommend try changing the delay intervals and observe the effects on the blinking of LED. Also I suggest to go through the language reference page of the arduino to get familiar with the command lines.
Hope you enjoyed the tutorial. If you have any suggestions/complaints or questions feel free to comment below. :)


Comments
Post a Comment